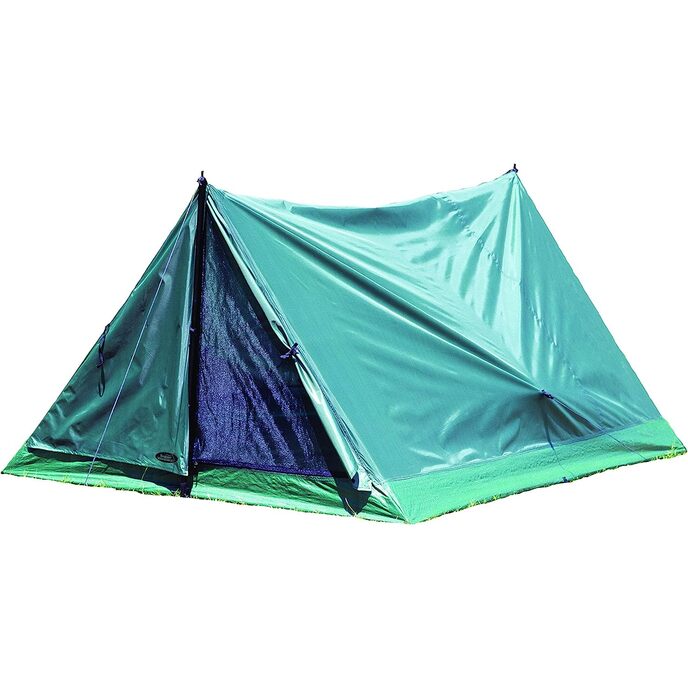
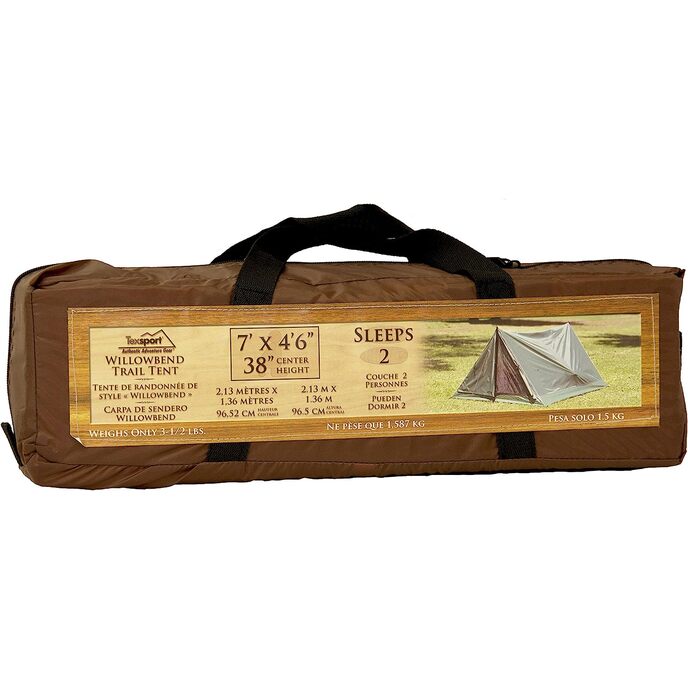
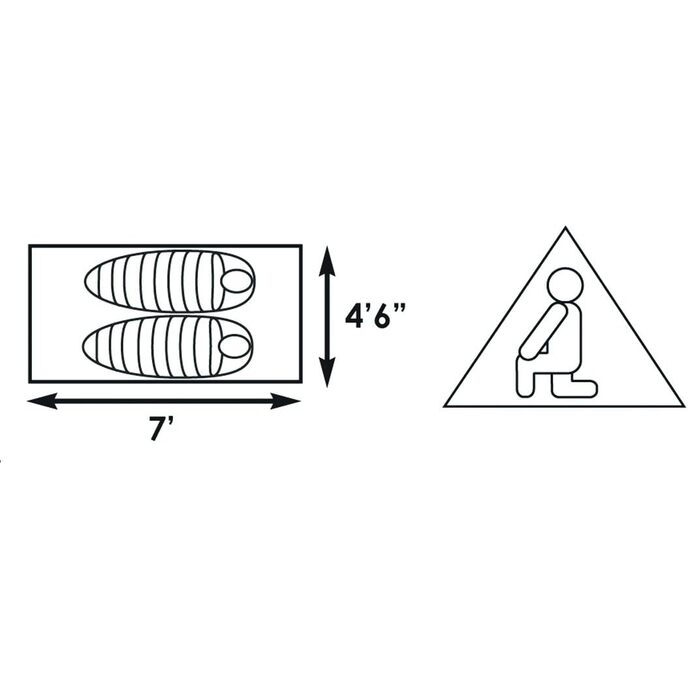
If you're looking at this tent, you're cheap. That's ok. I am too. Embrace it. But you do get what you pay for. So at $20 I knew this would not stand up to backpacking if I just took it out as is from the manufacturer. But for $20 for the tent, and a little time & extra money invested in improving it, you can end up with a very serviceable tent that may not have the bells and whistles of the high end tents (isn't camping about roughing it anyway?), but it will keep you warm & dry if used properly. Knowing how to use it PROPERLY is a key. It may seem like putting more money than is worth it into a tent you bought because you're being cheap in the first place, but think of it this way: it is an investment. Without upgrading, your cheap tent is garbage that WILL fail when you need it most. Then you'll just have to buy another new tent or spend the money to improve this one in the ways I'm going to recommend like you should have done in the first place (in addition to extra time/effort to make repairs from any damage). So either shell out the big bucks for an expensive well manufactured tent in the first place, get sucked into an endless cycle of buying new cheap tents as they fail one after the other, or do it right the first time by improving a cheap tent to a good tent. A lot of the costs like tarp, stakes, & paracord upgrades are reusable and already are (or should already be) in your backpack kit anyway, so they pay for themselves over time. Without further ado, here is my 2 cents: 1) As with most tents these days, you need to get better stakes than what's included by the manufacturer. No way around this. They are the light duty, thin steel type that will bend easily even when driven into relatively good ground. Get some stronger lightweight aluminum ones cheap from Walmart or somewhere else to replace them. This point cannot be emphasized enough for this tent because the key to keeping the A-frame design up using the poles is all tension. If the tension slackens at all (i.e. from bad stakes slipping while being pulled around in wind/rain/etc) then the tent will not be taut & stable shelter. It will then flap more and thus pull the stakes looser and thus flap more...etc. It will fail you when you need it most. GET BETTER STAKES THAT HAVE MORE BITE TO THEM!!! One alternate is to plan on using large, very heavy rocks/logs as dead-man weights with the guylines if they're available in the environment you hike. But that isn't always the case so I always keep the light, good stakes in the kit just in case. 2) The line that is included is similarly not useable. It is too weak to trust to hold up even under normal conditions, let alone during a windy storm. This is not a free standing tent so if this gives way in a storm it will fall in on you & you will really regret not taking the time to upgrade it beforehand as you know you should have. Real 550 paracord is the best substitute in my opinion. Yes, its test strength is massive overkill for what's needed, but paracord is a good versatile thing to keep in your pack anyway and the more papracord I have around to scavenge if needed the better. But you can certainly use something in between--heavier than the flimsy included line but not as heavy-duty as paracord--if all you ever plan on using it for is the tent guyline or other medium duty applications. 3) As you can see in the photo, pulling out the side guys creates a depression in the ceiling which could allow water to pool & leak inside. I sewed a small loop in the top middle to run a guy line all the way through the top from front to back so that when both sides are pulled taught, the top line keeps the tent top lifted up by the loop. Multiple loops would be even better to distribute fabric strain and I may add one on each side halfway between the center point and respective endpoints later if I have to. I'll wait to see how it works over time, but for now one loop in the middle seems good enough. Use small needle diameter for smaller holes but make sure it is securely sewn and well reinforced (use a tarp backing like you'll see for the side guy outs on the inside...I put my reinforcement tarp OUTSIDE to help reduce leakage possibility). Also, pay extra attention to any sewn areas when waterproofing (see below) 4) This is not waterproof, period. You could just seam seal, which would help some, but the fabric rating is not high enough to stand up to the water pressure head from a normal storm, let alone a hard storm. The product itself does not list the spec, but I have seen it listed as 800 pu on another site and this seems likely...you get what you pay for & this is cheap. 1500 pu is the minimum of what you'd want on a decent double wall tent with a rain fly, and single wall barrier tents (as this is) usually go from 2000-3000 pu. So unless you only plan to use this tent for car camping when you've checked the weather in advance and don't expect more than a misty drizzle, then you NEED more waterproofing. So I mixed mineral spirits with GE II silicone caulk (use a 1:1 ratio and make sure you get GE II, not GE I because GE I releases an acid while curing, GE II does not). Take care to mix well into a complete liquid and apply quickly before curing starts in the bucket. Let it soak into all the fabric & be very generous working it into all seams especially. Let it cure for a good and long time. This method does increase the tent weight by impregnating the fabric with silicone, but is great waterproofing though it does make the tent even less breathable which encourages condensation if you don't vent the tent properly. If you feel water dripping on you after this the problem is probably not leakage from outside. See below about condensation. Also, this tent is a hothouse and the silicone will make it hold in even more heat. A trick is pitch it in shade & hang out inside like it's a lounge during the warmer daytime if you don't really have to. Also be advised that the most common commercially available seam seal liquids, tent repair adhesive patches, etc are designed for polyurethane coated nylon fabrics and WILL NOT ADHERE TO SILICONE TREATED NYLON (SIL-NYLON). You'll need silicone based sealants/adhesives in the future if you go this route. 5) This style of tent design encourages condensation IF YOU DON"T ALLOW VENTILATION BY LEAVING THE FRONT AND BACK VENTS OPEN. Most of the time, you can do this without getting any water in (or at least much more than a minimal splash/spay) if you are creative and attentive to conditions like wind direction and strength, rain strength, etc and keep an just eye on it and adjust when necessary. I've also seen people modify the tent body with a homemade tarp vestibule to cover the opening(s) so they can stay fully open in rain without needing supervision. Do what you gotta do for what works for your purposes. 6) Instead of (or ideally in addition to) the above, just pitch a tarp on a line over the tent to block rain. I normally don't even bother, unless I think the storm will be massively epic, but it can't hurt other times and could also block some sun to reduce the tent's hothouse effect a little. You don't need the tarp as a for a groundcloth since the floor is made of tarp type material already, Do still clean up the area you're pitching it on to prevent tearing the floor by sharp rocks etc underneath. A tarp is very versatile piece of gear so you'll find plenty of uses for it with imagination so it's nice to have one around anyway. 7) Poles are lightweight aluminum, but cheap aluminum. Probably won't last forever, but used with care should last a while. If they do break in the forest, a stick can be easily modified to act as a replacement. The only thing to keep in mind about this is that sometimes (desert, high mountains above the tree line, etc) you may be in an environment where usable sticks are not readily available. Just something to keep in mind. A taut paracord line can be run between 2 attachment poi